

Common Reasons for an AC Not Blowing Cold
When troubleshooting an AC not blowing cold, immediately check your thermostat settings, replace a dirty air filter, inspect your circuit breakers, check refrigerant lines for frost, and ensure the outdoor unit has power. When you notice your AC is not cooling, performing these direct checks helps pinpoint whether the issue is restricted airflow, an electrical fault, or a refrigerant problem before scheduling a technician.
A modern central cooling system relies on a continuous balance between indoor air movement, heat transfer, and electrical control. If any single component falls out of sync, the indoor blower might continue to push air through your vents, but that air will feel lukewarm or humid rather than refreshingly cool. An AC not blowing cold is often the first sign that this balance has been disrupted.
Airflow Restrictions and Frozen Coils
Airflow restrictions are the most common reason for a sudden drop in cooling performance. Your central AC does not actually create cold air; it absorbs heat from the air inside your living space by pulling it across the indoor evaporator coil. When air cannot move freely across this coil, heat transfer stops.
- Clogged Air Filters: Dust, pet dander, and household debris quickly build up on standard pleated filters. A choked filter starves the system of air, increasing the power draw on the blower motor and causing coil temperatures to drop below freezing.
- Blocked Return Vents: Furniture, carpets, or closed supply registers disrupt airflow balance, creating static pressure issues in the ductwork.
- Frozen Evaporator Coils: A restricted system eventually develops a layer of frost and ice across the evaporator coil. Ice acts as an insulator, blocking heat absorption completely and leading to warm air coming from the supply registers.
If you are dealing with these symptoms, reviewing our guide on AC airflow and cooling issues can help you inspect the ductwork and check indoor air balance safely.
Electrical and Component Failures
Central air conditioners rely on heavy electrical loads to operate the outdoor compressor and condenser fan. If an electrical safety device trips or a critical starting component wears out, the indoor fan may run while the outdoor unit sits completely idle.
- Tripped Circuit Breakers: Outdoor units draw significant amperage on startup. Electrical surges, high outdoor temperatures, or aging wiring can trip the dedicated breaker in your electrical panel.
- Failed Dual Run Capacitors: Capacitors store electrical energy to give the compressor and fan motor the torque needed to start and run smoothly. Run capacitors are the single most common failed electrical part in residential cooling systems.
- Burnt Contactor Points: The contactor acts as an electrical relay switch that sends 240 volts to the outdoor components when the thermostat calls for cooling. Over time, electrical arcing burns and pits the metal contact points, preventing a solid electrical connection.
- Safety Float Switch Activation: If your indoor condensate drain line clogs with algae or sediment, water backs up into the drain pan. An overflow float switch will trip, cutting power to the outdoor condenser to prevent water damage to your ceiling or floors. When this occurs, you will often find your AC compressor will not start even though the indoor blower continues to operate.

The 6-Step DIY Diagnostic Checklist
Before calling an HVAC professional, you can run through a safe, structured sequence of homeowner-friendly checks. These initial steps require no specialized tools, cost nothing, and resolve a large percentage of cooling calls.
Always prioritize safety. Never reach inside the electrical cabinet of an outdoor unit, never touch exposed wiring, and never force a jammed electrical contactor manually. Use a non-contact voltage tester if you ever need to verify that power to an appliance disconnect is off before inspecting visible exterior parts.
1. Thermostat Settings and Power
It sounds simple, but accidental setting changes are behind many warm-air complaints. Smart thermostats, digital programming glitches, or household members adjusting preferences can easily disrupt operation.
- Verify Operating Mode: Confirm the thermostat is set to COOL rather than HEAT, OFF, or FAN ONLY.
- Check the Fan Switch: Set the fan mode to AUTO instead of ON. When set to ON, the indoor blower runs continuously 24 hours a day, blowing unconditioned, humid air through your registers even when the outdoor unit is between cooling cycles.
- Adjust the Setpoint: Lower the target temperature at least 3 to 5 degrees below the current ambient room temperature to ensure the thermostat initiates a call for cooling.
- Inspect Thermostat Power: If your thermostat display is blank or flickering, replace the backup AA or AAA batteries. A dead battery prevents the low-voltage control board from sending a 24-volt signal to the outdoor contactor.
2. Air Filter Inspection
A dirty filter is the leading cause of preventable HVAC failures. Checking your filter takes less than five minutes and should be done monthly during heavy summer cooling demands.
- The Visual Light Test: Remove the filter from the indoor return grille or the furnace filter slot. Hold it up to a bright light or the sun. If light cannot pass through the media, the filter is completely blocked and must be replaced immediately.
- Select the Right MERV Rating: While high-efficiency filters capture smaller particles, filters with overly high MERV ratings (MERV 13 and above) can severely choke residential blowers that were not designed for high static pressure. A standard MERV 8 to 11 filter offers a great balance of filtration and airflow.
- Regular Care: Incorporating frequent filter changes into your regular AC maintenance routine prevents ice formation, lowers energy bills, and protects the blower motor from early burnout.
3. Check for Frozen Lines When Your AC Is Not Blowing Cold
If your air conditioner is running but failing to lower the indoor temperature, inspect the refrigerant lines connecting the indoor unit to the outdoor condenser.
- Locating the Suction Line: Look for the larger copper pipe running into the outdoor condenser, which is normally covered in black foam insulation.
- Spotting Frost and Ice: If you see white frost, solid ice buildup, or water dripping heavily from beneath the insulation sleeves, your evaporator coil is frozen solid.
- Initiating a Fan Thaw Cycle: Do not attempt to chip ice away from the copper tubing with tools, as puncturing a line will cause a total refrigerant release. Instead, turn the thermostat system setting to OFF and switch the fan setting to ON. This forces the warm indoor air across the coil, melting the ice over the course of 2 to 4 hours.
- Checking the Drain Pan: Keep an eye on your condensate drain pan during the thaw cycle to ensure water flows outside properly without triggering the safety float switch.
4. Outdoor Disconnect and Breaker Status
The outdoor condenser requires its own high-voltage electrical feed. If the indoor blower runs but the outdoor unit remains silent, you may have an electrical supply disruption.
- Check the Main Electrical Panel: Locate the double-pole circuit breaker labeled "AC" or "Air Conditioner." If the breaker handle has tripped to the middle position, switch it fully to the OFF position, then reset it firmly to ON. If it trips again immediately, stop and do not reset it a second time.
- Inspect the Outdoor Disconnect Box: Mounted on the exterior wall near the condenser is a metal disconnect box containing a pullout switch or circuit breaker. Ensure the pullout handle is seated completely in the "ON" position.
- Listen for the Contactor Click: Stand near the outdoor unit while someone adjusts the thermostat to call for cooling. You should hear a distinct metallic "click" from the control panel inside the unit. That click confirms the thermostat is sending 24 volts to pull the contactor closed. If you hear a click or a quiet hum, but neither the fan nor the compressor turns on, the run capacitor has likely failed.
5. Outdoor Condenser Coil Cleanliness
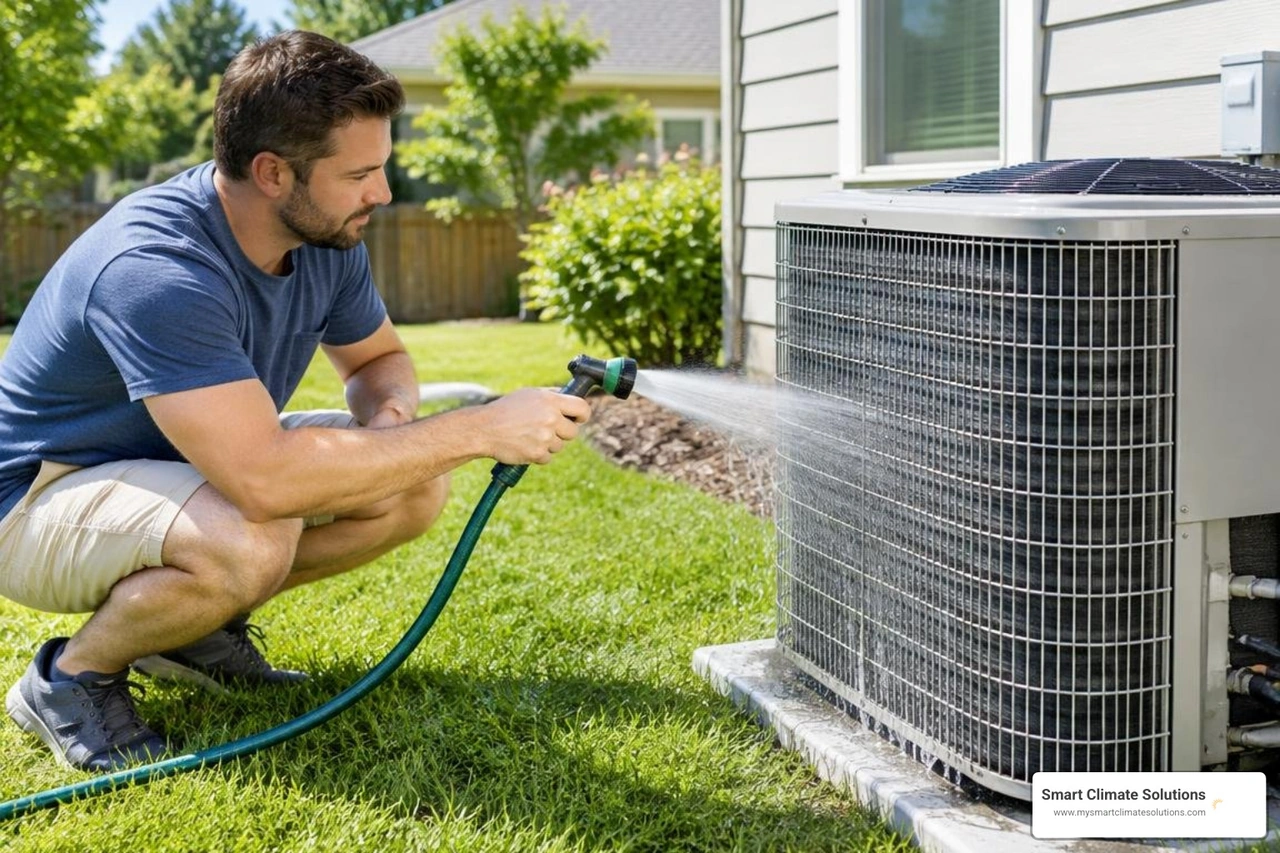
The outdoor condenser coil releases the heat pulled from your indoor living spaces into the outside air. Over time, outdoor coils accumulate dirt, lawn clippings, leaves, and dryer lint, which insulates the aluminum fins and blocks heat rejection.
- Clear Surrounding Vegetation: Maintain at least two feet of clear space around the entire perimeter of the outdoor unit. Trim back shrubs, tall grass, weeds, and tree branches.
- Gentle Cleaning Process: Turn off the power at the outdoor disconnect box before cleaning. Attach a standard spray nozzle to a regular garden hose and spray the aluminum fins from the outside inward, using moderate water pressure.
- Avoid Pressure Washers: Never use a high-pressure washer to clean condenser coils. The intense water stream will instantly bend the soft aluminum fins, permanently blocking airflow and requiring costly fin-combing repairs.
6. Supply and Return Temperature Split
Measuring the temperature split tells you how effectively your air conditioner removes heat from the air. This test gives you a clear, objective measurement of system performance.
- Let the cooling system run continuously for at least 15 minutes to stabilize operating pressures and temperatures.
- Use an infrared or digital probe thermometer to measure the air temperature entering your central return air grille.
- Measure the air temperature exiting the nearest supply register vent.
- Calculate the difference by subtracting the supply temperature from the return temperature:
$$\text{Temperature Split} = T_{\text{Return}} - T_{\text{Supply}}$$
In a healthy, properly charged system, the temperature split should measure between 16 degrees F and 22 degrees F.
- If the split is under 15 degrees F, the system is underperforming due to low refrigerant, dirty coils, or a weakened compressor.
- If the split is over 24 degrees F, airflow across the indoor coil is severely restricted by a clogged filter or a failing blower motor.
If your temperature split is outside this target range, our complete cooling troubleshooting guide provides deeper troubleshooting steps for evaluating airflow imbalances and mechanical problems.
Professional AC Repair Costs and Component Replacements

When basic DIY checks fail to restore cooling, the issue usually involves high-voltage electrical components, internal mechanical wear, or the closed refrigerant circuit. Handling refrigerant requires EPA Section 608 certification by federal law, making leak detection and charging strictly professional tasks.
The national average cost for an air conditioning repair is $417, though individual repair prices vary based on the specific part, equipment age, and diagnostic difficulty. Most service companies charge a standard diagnostic fee between $75 and $150, which covers the technician's travel and initial system evaluation.
| Component / Repair | Failure Symptoms | Average Cost Range | Repair Difficulty |
|---|---|---|---|
| Service Call & Diagnosis | System blowing warm air, intermittent operation | $75 - $150 | Professional Inspection |
| Dual Run Capacitor | Humming outdoor unit, fan won't spin, compressor clicking | $120 - $475 | Professional Electrical |
| Contactor Relay | Outdoor unit won't turn on or won't turn off | $150 - $350 | Professional Electrical |
| Refrigerant Recharge | Low temperature split, hiss sounds, iced coils | $100 - $600 | Certified Pro Only |
| Refrigerant Leak Repair | System low on charge, oily residue on copper joints | $225 - $1,600 | Certified Pro Only |
| Evaporator Coil Replacement | Leaking indoor coil, extensive corrosion, ice buildup | $600 - $2,000 | Advanced Mechanical |
| Compressor Replacement | Tripped breaker on start, locked rotor, loud growling | $1,200 - $2,800 | Major Mechanical |
For older units facing major mechanical failures, understanding total AC compressor repair costs can help you decide whether to replace the component or install a modern, high-efficiency cooling system.
Frequently Asked Questions About Cooling Problems
Why is my outdoor unit humming but the fan is not spinning?
This symptom usually points to a failed dual run capacitor or a seized condenser fan motor. When a capacitor weakens or blows, it cannot provide the electrical torque needed to start the fan motor, leaving the unit with a quiet electrical hum. You can test this by carefully giving the fan blades a gentle push with a long wooden stick or screwdriver while the unit is calling for cooling. If the fan starts spinning on its own after the push, the capacitor has failed and needs replacement. If it remains stuck or offers mechanical resistance, the fan motor bearings have seized.
What should I do if my copper line has ice on it?
If you spot ice or frost on the insulated copper suction line, turn off your air conditioner at the thermostat immediately. Set the indoor fan switch to ON to circulate room-temperature air across the indoor coil and melt the ice. Ice forms when airflow is choked by a dirty filter or when the system has a refrigerant leak. Running the air conditioner with a frozen coil can cause liquid refrigerant to flood into the compressor, which can destroy the compressor valves and result in an expensive replacement. Check your filter while the unit thaws, and contact a certified technician if the ice returns after restarting.
What is the average cost to fix an AC not blowing cold?
The typical cost to repair an air conditioner that has stopped cooling ranges from $150 to $600 for common issues like bad run capacitors, worn contactors, or simple drain line clogs. However, if the issue involves finding and repairing a refrigerant leak, recharging refrigerant, or replacing an evaporator coil, costs can climb between $600 and $2,000+. For severe mechanical breakdowns during heatwaves, calling for 24-hour emergency AC repair provides prompt diagnosis and restores indoor comfort quickly.
Conclusion
When an AC not blowing cold leaves your home warm and uncomfortable, walking through these six straightforward checks can save you time, help you avoid unnecessary service calls, and protect your equipment from severe damage. Verifying thermostat settings, changing clogged air filters, thawing frozen lines, resetting breakers, washing outdoor coils, and calculating your temperature split give you a clear look into your system's overall health.
If you have completed these steps and your home is still warm, or if you suspect electrical issues or a refrigerant leak, it is time to call a certified HVAC technician. Our team at Smart Climate Solutions brings more than 20 years of hands-on experience, 24/7 emergency support, and certified local expertise to homeowners across Pittsburgh, PA, and surrounding communities including Bethel Park, Carnegie, Canonsburg, Washington, Burgettstown, and South Hills, as well as Wheeling, WV, Weirton, WV, Steubenville, OH, and St. Clairsville, OH. If you are experiencing ongoing cooling trouble after a fresh system installation, explore our guide on troubleshooting a new air conditioner that is not cooling or schedule an appointment with our team to restore your home comfort.

.png)
