Why Your Pittsburgh Home Needs Properly Installed Dampers
How to install dampers in ductwork is a common question for homeowners struggling with uneven temperatures. Here is the quick answer:
Basic Damper Installation Steps:
- Turn off HVAC power at the breaker box.
- Measure and mark the duct for the damper.
- Cut an opening in the ductwork with tin snips.
- Insert the damper, ensuring proper alignment.
- Secure with sheet metal screws (#10 screws).
- Seal all joints with duct sealant to prevent air leaks.
- Install the actuator (for motorized dampers) and connect wiring.
- Test operation by cycling the damper open and closed.
In many Pittsburgh homes, some rooms are comfortable while others have frustrating hot and cold spots. Your HVAC system runs constantly and energy bills climb, but comfort is still out of reach.
Dampers solve this problem. These simple plates in your ductwork redirect conditioned air to specific areas, creating balanced temperatures. By controlling airflow, dampers eliminate temperature swings and can reduce your HVAC system's run time.
This guide covers everything you need to know about damper installation, from different damper types to the installation process, including considerations for older Pittsburgh homes.
I'm Bill Scott, general manager of Smart Climate Solutions. With over 15 years in the HVAC industry, I've helped thousands of Pittsburgh homeowners learn how to install dampers in ductwork for optimal comfort. Whether you're doing it yourself or considering a professional, this guide will help you make an informed decision.
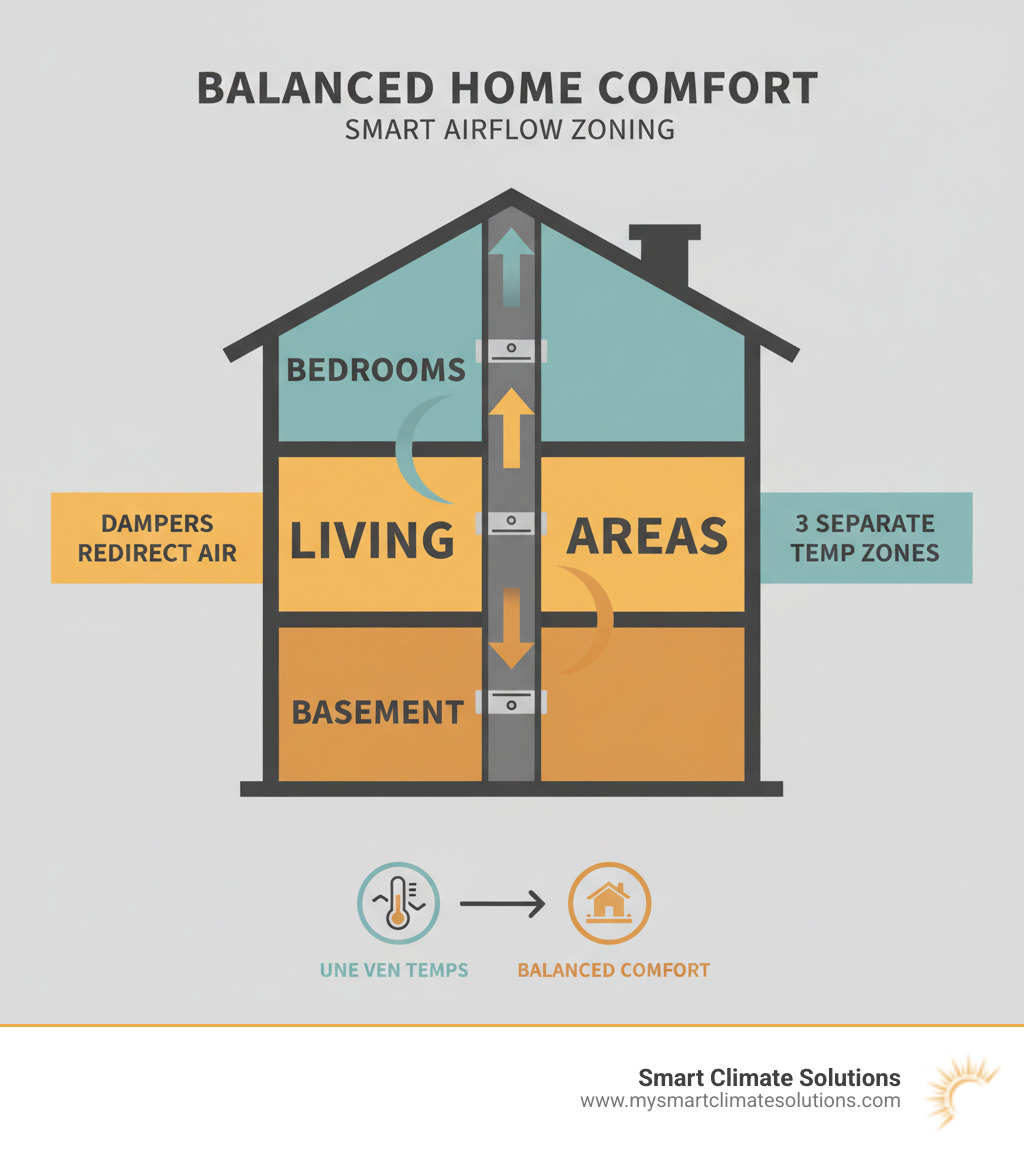
Understanding HVAC Dampers: The Key to a Balanced Home
What Are HVAC Dampers and Their Purpose?
An HVAC damper is a plate or valve inside your ductwork that controls the flow of heated or cooled air, much like a faucet controls water. Without dampers, air takes the path of least resistance, often leaving rooms farther from the furnace too cold or too hot.
Dampers give you control. They balance airflow and pressure, directing conditioned air exactly where it needs to go. When you learn how to install dampers in ductwork, you are learning how to redirect air to specific rooms, balance system pressure, and regulate air distribution for whole-home comfort. In Pittsburgh, with our humid summers and frigid winters, this precise control is essential.
Why Install Dampers? Benefits for Your Pittsburgh Home
Many Pittsburgh homeowners struggle with the same issues: upstairs bedrooms bake in the summer, and the basement is freezing in winter. The thermostat reads 72 degrees, but half the house disagrees.
Dampers solve these problems, offering significant benefits:
- Eliminate Hot and Cold Spots: By redirecting air, dampers ensure every room gets the conditioned air it needs for consistent comfort.
- Improve Energy Efficiency: When your HVAC system isn't fighting unbalanced airflow, it runs less. Targeted air delivery means less wasted energy.
- Lower Utility Bills: Better efficiency translates directly to savings on heating and cooling costs, which add up quickly in Pittsburgh's variable climate.
- Extend HVAC System Lifespan: A system that isn't overworking experiences less wear and tear, leading to fewer repairs and a longer life.
- Reduce Duct Noise: Bypass dampers can relieve the pressure buildup that causes whistling or rattling sounds in your ductwork.
For our challenging climate, properly installed dampers are a smart investment in your home's comfort and efficiency.
Types of Dampers for Residential Ductwork
When you're ready to tackle how to install dampers in ductwork, choosing the right type is crucial.
Manual dampers are the simplest, featuring an external lever or screw to adjust the damper plate. They are affordable and reliable but require manual adjustment at the duct.
Automatic or motorized dampers use a small motor (actuator) to open and close the plate. Connected to a thermostat or zone control panel, they adjust automatically, enabling true HVAC zoning.
Zone dampers are motorized dampers installed in branch ducts to control airflow to specific rooms or zones, each managed by its own thermostat.
Bypass dampers solve the problem of excess air pressure in zoned systems. When some zones close, a bypass damper opens to relieve the pressure, preventing noise and strain on your equipment. They can be barometric (pressure-activated) or modulating (electronically controlled).
Backdraft dampers prevent air from flowing backward through ductwork, keeping unconditioned air out of your system. They are common in exhaust applications.
Finally, dampers have different blade configurations. Parallel-blade dampers have blades that move in the same direction, while opposed-blade dampers move adjacent blades in opposite directions for finer control. For most residential jobs, either type works well.
Pre-Installation Prep: Tools, Materials, and Sizing
Before you learn how to install dampers in ductwork, proper preparation is key. Gathering your tools and materials first will save you time and frustration.
Essential Tools and Materials for Damper Installation
Here is your checklist for a successful installation.
Tools:
- Drill or driver
- Tin snips or a duct cutter
- Measuring tape and permanent marker
- Safety glasses and work gloves (non-negotiable)
- Level
- Caulking gun
- For motorized dampers: wire strippers, crimpers, voltage tester, and electrical fish tape
Materials:
- The correctly sized damper
- #10 sheet metal screws
- Duct sealant or mastic
- Start collars (if installing a bypass damper)
- Zip ties or wire clamps
- Shims (for a snug fit)
- A nearby fire extinguisher is always a smart safety measure.
How to Properly Size a Damper for Your Ductwork
Incorrectly sizing a damper is a common mistake that can undermine your project. A damper that is too small will not control airflow, while one that is too large will not fit.
- Measure your duct's internal dimensions: For rectangular ducts, measure height and width. For round ducts, measure the diameter.
- Match the damper to the duct shape: Use round dampers for round ducts and rectangular for rectangular ducts. Use transition collars if you must adapt between shapes.
- Understand the mounting method: For in-duct mounting (damper frame inside the duct), size based on the damper's outer dimensions (O.D.). For on-face mounting (damper between duct sections), use the inner dimensions (I.D.).
- Allow for clearance: The duct opening should be about 1/4 inch larger than the damper to ensure a proper fit without binding.
- Consult manufacturer specifications: Always check the manufacturer's guide for your specific damper model to get exact dimensions and requirements.
Getting the sizing right the first time is critical for a successful installation.
How to Install Dampers in Ductwork: A Step-by-Step Guide
This section covers the core of the installation. The process requires patience and precision, but the fundamentals are the same whether you are installing a zone damper or a bypass damper.
Safety First: Essential Precautions
Carelessness with sheet metal and electricity can lead to injury. Follow these precautions:
- Turn off the power. Go to your breaker box and flip the breaker for your furnace or air handler. Use a voltage tester to confirm the power is off.
- Wear proper PPE. Safety glasses are essential to protect your eyes from metal fragments. Heavy-duty work gloves will protect your hands from razor-sharp sheet metal edges.
- Handle the damper by its frame. Never grab the blades, linkage, or actuator, as this can damage the delicate components.
- Keep a fire extinguisher nearby. This is good practice for any home project involving power tools.
- Call a pro for wiring if you are unsure. Improper electrical connections are a serious fire hazard. It is not worth the risk.
How to Install Dampers in Ductwork: The Core Steps
With safety covered, let's begin the installation.
Find the right spot. Install zone dampers in branch ducts leading to specific rooms. Install bypass dampers between the supply and return plenums, near the air handler. Ensure the location is accessible for future maintenance.
Measure and mark the duct. Measure your damper, then transfer those dimensions to the ductwork, adding about 1/4-inch of clearance. Use a permanent marker to draw clear cut lines.
Cut the opening. Using tin snips or a duct cutter, carefully cut along your marked lines. File down any sharp edges after cutting.
Insert the damper. Slide the damper into the opening, making sure it sits square and level. The damper frame must rest flat on the duct floor. Before securing it, manually check that the blades can move freely.
Secure the damper. Use #10 sheet metal screws, placed no more than 12 inches apart (at least two per side). Never put screws through the damper's linkage or moving parts. Use shims if needed for a snug fit.
Seal all joints. This is a critical step. Apply a generous bead of duct sealant or mastic around the entire connection between the damper frame and the ductwork to create an airtight seal. Do not get sealant on moving parts.
Install the actuator (for motorized dampers). Attach the actuator to the damper shaft and connect the wiring according to the manufacturer's instructions. Ensure you provide strain relief for the wires.
For a visual guide, you can watch a demonstration on installing a bypass damper.
Special Considerations for a Flawless Installation
Pittsburgh homes have a variety of ductwork systems. Here is how to handle common situations.
Round vs. Rectangular Ducts: Use transition collars to connect different shapes, sealing all connections with mastic.
Non-Metallic Ductwork (Flex Duct): You cannot cut directly into flex duct. Use sleeved dampers for a rigid connection point. Another option is a damper that installs directly into the register boot, eliminating the need to cut ductwork or drywall.
Inaccessible Ductwork: When ducts are hidden behind walls, specialized retrofit dampers are the solution. Some dampers can be guided into branch takeoffs through an access point in the main trunk. Boot-loading dampers can be inserted through the register boot itself.
Pneumatic Dampers: These use air pressure instead of electricity. You will need to run UL-rated pneumatic tubing instead of wires. Use T-fittings to connect multiple dampers in the same zone and leave a service loop of extra tubing at each damper for future adjustments.
Post-Installation: Testing, Troubleshooting, and Maintenance
After installation, it is crucial to test your dampers to ensure they work correctly and catch any issues early.
Testing and Troubleshooting Your New Damper
First, verify that your dampers move freely and respond correctly.
- Manual Cycling: For manual dampers, move the lever through its full range. For motorized dampers, cycle the blades by hand (if the design allows) to check for smooth, resistance-free movement.
- Actuator Test: Restore power to the HVAC system. Signal the damper to open and close using the zone panel or thermostat. It should move to the fully open and fully closed positions smoothly and within about 15 seconds each way.
Common Issues and Solutions:
Whistling or Rattling: This noise is usually caused by high air pressure or loose connections. First, check that all screws are tight. For whistling, many motorized actuators have an angular rotation stop that lets you set a "minimum damper position." This prevents the damper from closing completely, which stops the noise. A bypass damper is the best solution for system-wide pressure issues.
Stuck or Binding Damper: If the blades are stuck, turn off the power immediately. This is often caused by an improper installation (not square) or debris in the duct. Inspect for obstructions. If the frame is bent, you may need to reinstall it. For minor binding, a silicone lubricant can help. Never use petroleum-based lubricants, as they attract dust and will worsen the problem.
Inadequate Airflow: If you still have uneven temperatures, verify the damper is opening and closing fully. Check for leaks in pneumatic tubing. Ensure the damper was sized correctly for the duct. If problems persist, it may be time to call a professional for a system evaluation.
How to Maintain Dampers in Ductwork for Longevity
The good news about how to install dampers in ductwork is that they require minimal maintenance once installed correctly.
- Annual Inspection: Visually inspect all dampers for wear, damage, or corrosion during your regular HVAC tune-up.
- Cycle Test Every 6 Months: Fully open and close motorized dampers to ensure they move freely and prevent seizing.
- Clean as Needed: Gently clean debris from blades and linkage. A soft brush or cloth is usually sufficient.
- Check Connections: Periodically check that all screws and electrical connections are tight, as system vibrations can loosen them over time.
- Lubricate with Silicone: If lubrication is needed, only use a silicone-based spray. It repels dust and provides long-lasting smooth operation.
Following these simple practices will ensure your dampers provide comfort and efficiency for years to come.
When to Call a Professional for Damper Installation
While this guide details how to install dampers in ductwork, some situations are best left to professionals. Knowing when to call for help is as important as knowing how to do the work yourself, preventing costly mistakes and ensuring your safety.
Complex Scenarios Requiring an Expert
Professional help is essential in these scenarios:
- Complex Zoning Systems: Designing a multi-zone system with multiple dampers, thermostats, and a control panel requires expert knowledge to ensure it operates harmoniously.
- Control Panel Wiring: If you are not comfortable with low-voltage electrical work and reading wiring diagrams, a professional should handle the connections to prevent equipment damage or safety hazards.
- Variable-Speed HVAC Systems: These modern systems require specific modulating bypass dampers. Installing the wrong type can reduce efficiency and create noise.
- Bypass Damper Sizing: Correctly sizing a bypass damper involves complex calculations based on your system's capacity and duct design. An improperly sized damper can strain your equipment.
- Inaccessible Ductwork: If your ducts are hidden in finished walls or tight crawlspaces, professionals have the specialized tools and experience to install retrofit dampers without damaging your home.
- Code Compliance: Professional technicians in Pittsburgh and surrounding areas like South Hills, Burgettstown, and Weirton are current on local HVAC codes, ensuring your installation is safe and compliant.
The My Smart Climate Solutions Advantage
When you work with Smart Climate Solutions, you are partnering with Pittsburgh HVAC experts who understand the unique challenges of our region's homes.
Our certified technicians bring over 15 years of combined experience to every job, from historic homes in South Hills to new construction in Washington. We anticipate and solve problems quickly.
Proper sizing and placement is where our expertise shines. We analyze your entire system to determine the optimal damper type, size, and location to eliminate hot and cold spots effectively.
Safety and code compliance are our top priorities. We follow all protocols and stay current with local codes across Pittsburgh, Burgettstown, Steubenville, St. Clairsville, and Weirton, giving you peace of mind.
We also provide comprehensive HVAC care, looking at your system holistically to ensure everything works together efficiently. Sometimes the solution involves more than just dampers, and we identify all factors affecting your comfort.
Don't let uneven temperatures compromise your comfort. For a professional and reliable HVAC installation, contact our team today to discuss how properly installed dampers can transform your home's climate control.



.png)
